Crystal is a very powerful language that advertises itself as being fast as C bust slick as Ruby. After developing an application with crystal, one is usually left with the decision of how to package and deploy the application. Docker, offers us one of the most ubiquitous and proper way to deploy the applicaton. In this tutorial, I will show you one or two things about building your application with docker.
Crystal supports Static Linking, meaning that crystal can build an application with all the required static libraries embedded, so that it is not required on the host machines. This makes the compiled application very portable. Crystal supports static linking by using musl-libc. Since this is present in alpine-linux, using the alpine linux docker image is the recommended way to build crystal app.
Consider the dockerfile below
ARG CRYSTAL_VERSION
FROM crystallang/crystal:${CRYSTAL_VERSION} as builder

# set the working directory to /app
WORKDIR /app

# copy the dependencies based files
COPY ./shard.yml ./shard.lock /app/
RUN shards install --production -v

# Build the binary app in the builder stage
COPY . /app/
RUN shards build --static --no-debug --release --production -v

# ===============
# Result image with one layer
FROM alpine:latest
WORKDIR /
COPY --from=builder /app/bin/demo-app .

EXPOSE 3000

ENTRYPOINT ["/demo-app"]
Please note that this is what the shard.yml looks like
Databases are fundamental to the development of modern apps, as such it is extremely vital for a developer to be familiar with their operations. PostgreSQL is a very popular RDBMS (Relational Database Management System) that is reputed to be the Worlds most advanced RDBMS. In this tutorial, I will teach you how you can run the postgres database server locally on your machine just using Docker and Docker-Compose.
What do you need?
An IDE (Integrated Development Environment), a very good one is Vscode. (Note: This is not a hard requirement, you can use a text editor also)
If you are not familiar with docker-compose, the file above may look complex, however thats not the case, so lets try explain it together by highlighting the following
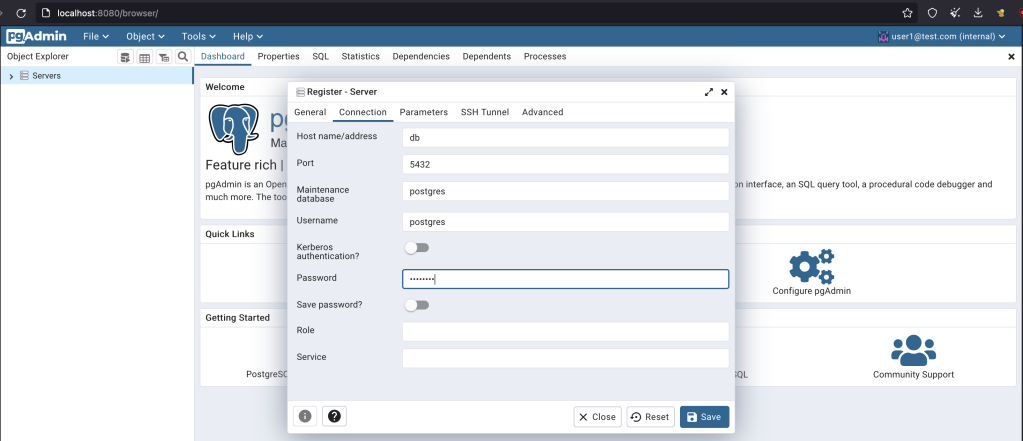
We are creating two containers (services) named db (the postgres database service) and pgadmin (the web based tool for accessing postgres)
We are creating a network named backend that is used by the two services. This allows the two services to refer to each other just by their names
We are creating a volume named db-volume. This is used to make the data used by the postgres server (db) available locally, this can be used for backup etc.
We are exposing the postgres database (db) on the host using the port 5432.
We are exposing the pgadmin app to the host machine using port 8080. Meaning, after starting your docker-compose file, you can access the pgadmin app by visiting http://localhost:8080 in your browser.
Starting your services
After creating your docker-compose.yaml file, just cd into the directory where it is and run the following
$ docker-compose up -d
[+] Running 29/2
 ✔ db 13 layers [⣿⣿⣿⣿⣿⣿⣿⣿⣿⣿⣿⣿⣿]      0B/0B      Pulled                                                                                                                         16.3s
 ✔ pgadmin 14 layers [⣿⣿⣿⣿⣿⣿⣿⣿⣿⣿⣿⣿⣿⣿]      0B/0B      Pulled                                                                                                                   17.1s
[+] Running 4/4
 ✔ Network postgresql_backend      Created                                                                                                                                      0.0s
 ✔ Volume "postgresql_db-volume"   Created                                                                                                                                      0.0s
 ✔ Container postgresql-pgadmin-1  Started                                                                                                                                      1.3s
 ✔ Container postgresql-db-1       Started                                                                                                                                      1.3s
This command will download the two images specified in the compose file (postgres and dpage/pgadmin4)and then proceed to setup the volumes and networks to make it work properly. Please note , the -d flag makes the docker-compose run in detached mode, i.e. it runs in the background as a daemon.
Stopping your services
To stop your services from running after starting it, all you need to do is run the following command
$ docker-compose down
Cleaning up after yourself
After stopping your services, docker-compose still retains you defined volumes and networks, so that if you restart your services, it can use the old data and not start afresh. If you however wish to tear everthing down, do the following
The Alpine Linux docker image is a minimal docker image that is based on the Alpine Linux, in its bare form, it is as small as 5MB in size. However, by default, BASH is not included or installed in alpine, it defaults to /bin/sh. This becomes sometimes difficult if you already have scripts targeted at BASH and this needs to be ported into an alpine image.
The easy solution is to install BASH into the image, and this can be done easily as demonstrated below
$ apk update
$ apk upgrade
$ apk add bash
This can also be included into a Dockerfile as shown below
FROM alpine:3.17.2

RUN apk update && \
    apk add bash
Then, you can build the image as follow
$ docker build -t alpine/demo:v1 -f Dockerfile.
This newly generated docker image can then be used with BASH shell as follow
Did you know that if you have a service that sends its output to the stdout like nginx does, docker caches the logs and keeps it with the /var/lib/docker folder.
This makes it possible for your to run docker service logs {_DOCKER_ID} / docker container logs {_DOCKER_ID} command and docker retrieves all the stored logs, this is a very nifty feature but the problem is that it quickly grows out of hand and the logging file grows very large and it can starve your host machine of space.
To fix, this you can do two quick things
set a max-size for the log file
enable log rotation by setting a maximum number of logs to eep
The cool thing is that once the log file reaches the max-size, docker flushes it and starts with a new one, but once the number of logs reaches the specified number, docker removes the oldest ones to accomodate new ones.
The config above is self explanatory, it would limit the maximum sizeof the docker log file for the service something_you_like to 50M(50 megabytes)and the will log rotate to keep only a maximum of 5 files.
Docker is a very important and exciting tool, at the most basic level , it runs containers from pre-built images. Usually, you would need to see a list of the running containers and this can be done easily using the command below
$ docker ps
This will give an output similar to this
Also, you can get this formatted as json by using the command below
$ docker ps --format="{{ json . }}"
The problem with the output above is that the json isn’t fully valid to be used in another application, to resolve this issue, we can query the data from the Docker Engine Api using the command below