Node.js is the most popular javascript runtime environments and it is extremely popular amongst developers. It uses npm as its package manager. Another alternative to npm is yarn which is touted to be more performant (i.e. faster than npm), however not fast enough.
Issues With Npm/Yarn
The main issue that many developers have with npm is that it is slow when used on projects with really big dependecies, also it does not manage the creation of the node_modules efficiently, duplicating dependencies across multiple projects.
Introducing PnPm
Here comes PnPm, a highly performant (fast) new package manager for node.js with the efficient disk space management. Pnpm is a drop in replacement for npm, it incorporates all the features of npm and it does it more efficiently.
Features of PnPm
Up to 2 times faster than npm
Shareable node_modules content, i.e – Files inside node_modules are stored in a single content-addressable storage, this is then cloned or hard-linked to projects where the libraries are used. This can greatly reduce disk space usage by removing the need for duplications.
PnPm Workspaces – This allows developers to isolate concerns by using multiple packages in a repository.
Peers installation
Patching dependencies and so much more…
Enough Talk, How do you install it?
To install PnPm is very easy, explore the following options
Install using npm
To install PnPm using npm, there are two available packages for the pnpm CLI, namely, pnpm and @pnpm/exe.
pnpm is a ordinary version of pnpm, which needs Node.js to run.
@pnpm/exe is the version packaged with Node.js into an executable, so it can be executed on a system with no Node.js installed.
Crystal is a very powerful language that advertises itself as being fast as C bust slick as Ruby. After developing an application with crystal, one is usually left with the decision of how to package and deploy the application. Docker, offers us one of the most ubiquitous and proper way to deploy the applicaton. In this tutorial, I will show you one or two things about building your application with docker.
Crystal supports Static Linking, meaning that crystal can build an application with all the required static libraries embedded, so that it is not required on the host machines. This makes the compiled application very portable. Crystal supports static linking by using musl-libc. Since this is present in alpine-linux, using the alpine linux docker image is the recommended way to build crystal app.
Consider the dockerfile below
ARG CRYSTAL_VERSION
FROM crystallang/crystal:${CRYSTAL_VERSION} as builder

# set the working directory to /app
WORKDIR /app

# copy the dependencies based files
COPY ./shard.yml ./shard.lock /app/
RUN shards install --production -v

# Build the binary app in the builder stage
COPY . /app/
RUN shards build --static --no-debug --release --production -v

# ===============
# Result image with one layer
FROM alpine:latest
WORKDIR /
COPY --from=builder /app/bin/demo-app .

EXPOSE 3000

ENTRYPOINT ["/demo-app"]
Please note that this is what the shard.yml looks like
Sometimes, when you run the command sudo apt update -y or sudo apt upgrade -y, you get the error message such as
The repository 'http://gb.archive.ubuntu.com/ubuntu kinetic Release' no longer has a Release file.
This error is caused because the releases sources for the ubuntu version you are attempting to update has been migrated to an archive server. So, to fix this solution, all you need to do is point the sources to the archived server.
This can be easily achieved by running the commands below
# Step 1: backup your existing source list file
$  cp /etc/apt/sources.list /etc/apt/sources.list.bak

# Step 2: run sed to replace the sources path
$ sudo sed -i -re 's/([a-z]{2}.)?archive.ubuntu.com|security.ubuntu.com/old-releases.ubuntu.com/g' /etc/apt/sources.list

# step 3: update the OS and do a dist upgrade
$ sudo apt-get update && sudo apt-get dist-upgrade
Once the commands listed above has been executed successfully, the error message will disappear and you can then freely update your OS at any time without any hinderances.
The instance metadata on EC2 instances is provided by the Instance Metadata Service (IMDS) from Amazon. It helps provide metadata information such as hostname, list of public keys, security groups etc though the web endpoint http://169.254.169.254/latest/meta-data.
There are two (2) versions of the IMDS, v1 and v2. It is therefore helpful to be able to detect which IMDS version is enabled on an EC2 instance, you can do the following to find out.
Step 1: Get The Metadata Options of the Instance To Check
Note: in this example, the name of the instance is TestInstance
The AWS IAM (Identity and Access Management) Service is the core service for managing identity and securing access to all AWS services. An AWS IAM User is usually created once and forgotten, however sometimes it becomes important to change the username of an AWS IAM User without losing access to the attached groups, access keys etc. In this tutorial, we will demonstrate how to change the username of an AWS IAM user fulfilling the following requirements.
The UserId of the AWS IAM User remains the same after the change
The AWS IAM User remains attached to all groups they were attached to before the change
All policies attached to the IAM User remains attached under the new username
All other permissions granted to the IAM User remains the same.
To achieve the rename as described above, lets follow the steps listed below
Step 1: Obtain the current username and confirm aws is configured properly
Run the following command to be sure that the aws profile is configured correctly
Step 2: Run the command to change the username
This command will change the username from my.email@old.com to my.email@new.com as follows
Step 3: Get the IAM user again to confirm the change has been truly effected
Run the command displayed below to confirm that the AWS IAM username has been updated. Note, the UserId remains unchanged before and after the change.
Jenkins in many quarters is regarded as the swiss army of (CI/CD) Continuous Integration and Continuous Deployment Tools. It has various ways of triggering jobs, which ranges from
Scheduled Times (Build Periodically)
Polling SCM
Build when a change is pushed to a VCS such as Github/Bitbucket etc
However, sometimes we desire to trigger a job remotely from a bash script. The flexibility of Jenkins equally allows for this, in this tutorial, I will show you how to do this while also protecting the jenkins server from CSRF (Cross Site Request Forgery) requests.
Step 1: Login To Jenkins And Generate Api Token
For the bash script to interact with the jenkins server, it will require an API Token. Follow the following steps to generate one.
Login To Jenkins
Click your profile name to visit your profile
Click the configure button
Click the Add New Token button
Note: You will have to copy and save this token because once generated, it cant be recovered again. Check the image below
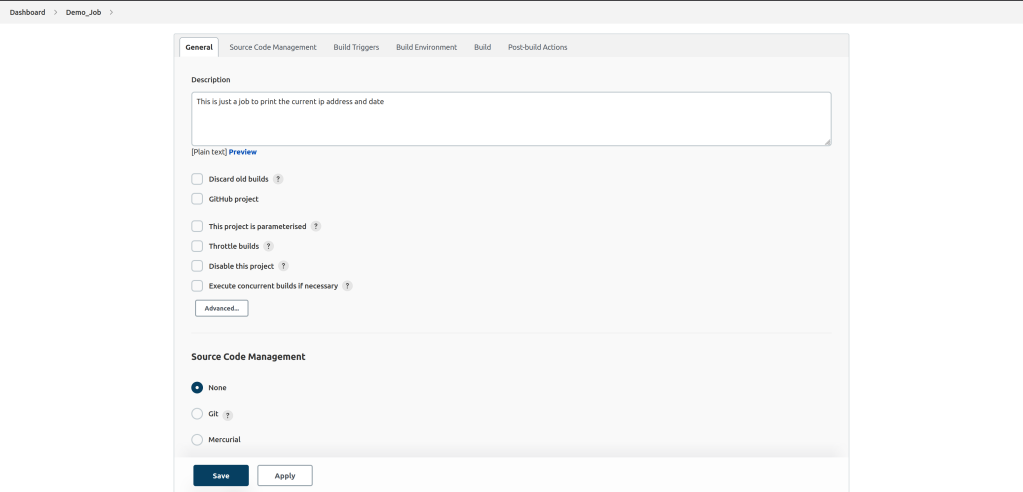
Step 2: Create A Demo Job To Trigger Remotely
in this step, we create a demo job to trigger remotely, in this case, the job will be called Demo_Job, which is a job to print the server remote IP and the current date.
The bash script being executed by the Jenkins job is given below as
#!/usr/bin/env bash

ipAddress=$(curl -Ls https://ip.me)
# Echo IP and date
echo "Ip Address = ${ipAddress} at $(date)"
Step 3: Write The Bash Script To Use To Trigger The Job Remotely
In this step, we will make use of the api token generated in step 1 above, as well as a CRUMB token, this token is similar to the csrf_token used for protecting form requests in laravel and other web frameworks. It ensures thats requests issued to the jenkins server cannot be forged. You can read more about it here.
#!/usr/bin/env bash

JENKINS_URL="https://jenkins.dev"
JENKINS_USER="admin"
JENKINS_TOKEN="xxxxxxx-put-api-token-here-xxxxxxxx"
JENKINS_AUTH="$JENKINS_USER:$JENKINS_TOKEN"
JENKINS_CRUMB_TOKEN_URL="${JENKINS_URL}/crumbIssuer/api/json";
JENKINS_JOB_NAME="Demo_Job"
JENKINS_JOB_URL="${JENKINS_URL}/job/${JENKINS_JOB_NAME}"


# obtain the crumb token
CRUMB_TOKEN=$(curl --silent \
                   --user "$JENKINS_AUTH" \
                   $JENKINS_CRUMB_TOKEN_URL | jq -r '.crumb' \
                   2> /dev/null);

# exit the script if the crumb token could not be obtained
if [[ $? -ne 0 ]]; then
    echo "Crumb Authentication Failed"
    exit;
fi

curl --silent \
    --user "$JENKINS_AUTH" \
    -H "$CRUMB_TOKEN" \
    -X POST "$JENKINS_JOB_URL/build"
Save the above script into a file and make it executable, then run it. This should trigger the Demo_Job remotely adn then you will see the job build on the jenkins server.
This means you’ve been able to trigger the jenkins job remotely. Hope this has been helpful for you.
Terraform is a very versatile tool for writing IaaC (Infrastructure As Code) and one of the most common use-cases of terraform is creating Ec2 instances.
What is userdata?
AWS Userdata is a set of commands that is ran at the creation of an EC2 instance that can be used to modify the EC2 instance. It can be used to perform a host of operations such as
Setting the hostname
Updating the OS
Installing a new package
In this example, we will be using the userdata to update the operating system, set the hostname for the machine and also install a package, nginx.
Databases are fundamental to the development of modern apps, as such it is extremely vital for a developer to be familiar with their operations. PostgreSQL is a very popular RDBMS (Relational Database Management System) that is reputed to be the Worlds most advanced RDBMS. In this tutorial, I will teach you how you can run the postgres database server locally on your machine just using Docker and Docker-Compose.
What do you need?
An IDE (Integrated Development Environment), a very good one is Vscode. (Note: This is not a hard requirement, you can use a text editor also)
If you are not familiar with docker-compose, the file above may look complex, however thats not the case, so lets try explain it together by highlighting the following
We are creating two containers (services) named db (the postgres database service) and pgadmin (the web based tool for accessing postgres)
We are creating a network named backend that is used by the two services. This allows the two services to refer to each other just by their names
We are creating a volume named db-volume. This is used to make the data used by the postgres server (db) available locally, this can be used for backup etc.
We are exposing the postgres database (db) on the host using the port 5432.
We are exposing the pgadmin app to the host machine using port 8080. Meaning, after starting your docker-compose file, you can access the pgadmin app by visiting http://localhost:8080 in your browser.
Starting your services
After creating your docker-compose.yaml file, just cd into the directory where it is and run the following
$ docker-compose up -d
[+] Running 29/2
 ✔ db 13 layers [⣿⣿⣿⣿⣿⣿⣿⣿⣿⣿⣿⣿⣿]      0B/0B      Pulled                                                                                                                         16.3s
 ✔ pgadmin 14 layers [⣿⣿⣿⣿⣿⣿⣿⣿⣿⣿⣿⣿⣿⣿]      0B/0B      Pulled                                                                                                                   17.1s
[+] Running 4/4
 ✔ Network postgresql_backend      Created                                                                                                                                      0.0s
 ✔ Volume "postgresql_db-volume"   Created                                                                                                                                      0.0s
 ✔ Container postgresql-pgadmin-1  Started                                                                                                                                      1.3s
 ✔ Container postgresql-db-1       Started                                                                                                                                      1.3s
This command will download the two images specified in the compose file (postgres and dpage/pgadmin4)and then proceed to setup the volumes and networks to make it work properly. Please note , the -d flag makes the docker-compose run in detached mode, i.e. it runs in the background as a daemon.
Stopping your services
To stop your services from running after starting it, all you need to do is run the following command
$ docker-compose down
Cleaning up after yourself
After stopping your services, docker-compose still retains you defined volumes and networks, so that if you restart your services, it can use the old data and not start afresh. If you however wish to tear everthing down, do the following
Curl is the most popular Swiss Army Knife used for interracting with HTTP requests. One very common requirement one will have sooner than later is to be able to trick curl to resolve a domain to specific IP. This is very helpful especially in cases of debugging or testing, when one wishes to point the product or website url to a staging IP without altering the hosts file on the machine.
Consider this example. You have a domain (www.myexample.com) that points to the IP (220.100.20.30) as shown below
$ dig +short www.myexample.com

220.100.20.30
However, we desire to test the domain against your local server with IP (127.0.0.1), what we do is trick curl to resolve (www.example.com) to resolve to the testing server IP as follow
One of the beauty of terraform is that it is idempotent which is the attribute that makes it very predicatable. Terraform compares the current state with the intended state and if there is no difference, it doesnt re-run the same code.
However, there are times that you will always want a piece of code to run , it could be the creation of a file to record the execution time of a terraform run. To achieve this, you can use the null_resource with the trigger attribute set to the timestamp. This will make sure that for that resource, the state is always invalidated on every run, triggering a re-run of the resource.
Too much talk, lets see some code. The code below will always create a file named last-run.txt with the current date and time.
After execution, you can run a plan to see that it will be re-created again
$ terraform plan

Terraform will perform the following actions:

  # null_resource.echo-cat must be replaced
-/+ resource "null_resource" "tester" {
      ~ id       = "3621864573746826936" -> (known after apply)
      ~ triggers = { # forces replacement
          ~ "always_run" = "2023-08-09T14:47:18Z" -> (known after apply)
        }
    }

Plan: 1 to add, 0 to change, 1 to destroy.